How to Use/Read a Hydrometer for Wine and Beer(The Easy Way)
Today I am going to show EXACTLY how easy it is to use a hydrometer.
In fact this is the same process which has allowed me to brew excellent beer, wine and cider during the last few years.
And I will let you into a secret - it is not rocket science
In fact if you are not scientific like me you will love this easy to follow guide
LET'S DIVE STRAIGHT IN
- What is a hydrometer?
- How do I use a hydrometer to calculate ABV?
- Using a hydrometer when making wine
- Using a hydrometer when making beer
- How to measure the specific gravity using the hydrometer
- How to use the hydrometer using a four-step process
- Stage 1: Using the trial jar with the hydrometer
- Use a Wine Thief
- Stage 2: Obtain the Original Gravity Reading
- Stage 3: Calculate with Temperature
- Stage 4: Obtaining the final gravity reading (FG)
- Temperature Correction Chart for Hydrometer Reading
Equipment

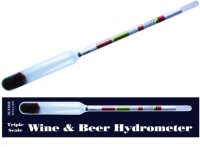

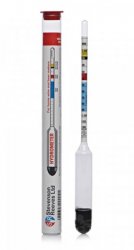
A hydrometer is a straightforward device that measures the density of a liquid comparing it to water.
It usually comes with a thin plastic case to help to protect it and uses a scale called specific gravity or just gravity for short.
It works on the same principle as floating in the dead sea.
The dead sea is so easy to float in because it is full of dissolved minerals.
Much like in the Dead Sea, the more dissolved sugar there is in a beer or wine solution, the higher the hydrometer floats, giving a higher reading on the hydrometer's scale.
The easiest way to use a hydrometer is to collect a sample of the must (wine) or wort (beer) using a sterilised and rinsed wine thief (pipette), and a trial jar.
A hydrometer is for use in any wine, beer or cider making situation.
In terms of brewing beer, wine or cider the hydrometer measures the amount of dissolved brewing sugar in the recipe.
If you notice the amount of sugar going down, fermentation is working, and alcohol is increasing.
The measurements/readings show how the yeast is turning sugar by volume and lets you know how well the fermentation process is coming along.
A hydrometer looks like a round pointy glass rod with lines on it to use as a measurement.
It is much like a thermometer used for inserting under the tongue except that one end of it is fatter.
Depending on how much the hydromtera floats or sinks in various liquids, you can measure how dense the fluids are.
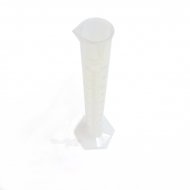
Brew Mart's recommendation is to use a trial jar which is a specific jar to use with the hydrometer for this purpose.
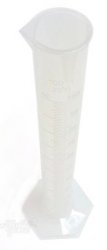
A trail jar made from plastic is better than a glass one as the glass ones can break easily.
The trial jar is 20cm long and has a diameter of approximately 3.5cm. and has measurements on the side.
This enables you to fill the right amount of liquid leaving a space at the top for the insertion of the hydrometer in order to test the results.
Take care to use the same hydrometer for each measurement in the same experiment as different hydrometers may vary a little.
The analysis of pure water at 20°C - 68°F will have a gravity of 1.000. (This reads one point zero zero zero).
Add sugar to the water, and the gravity will increase.
Adding alcohol to the pure water the gravity will go down as alcohol is less dense than water.
As things heat up, they get less dense.
Using the same hydrometer and sugary water, now at 40°C - 104°F, the water will appear to have a lower gravity.
If your liquid has a much different temperature to 20° C, you can also use an online calculator or app to calculate how the reading due to the differing temperature is effected.
What this means is that you can tell how well your wort or must is fermenting by taking a reading of the original gravity (OG) before you add your yeast.
Taking this reading is a critical measurement as it indicates the amount of sugar you can use.
The beer or wine yeast then turns the sugar into alcohol which in turn gradually reduces the gravity until it reaches the final gravity (FG).
The final gravity (FG) is as low as the gravity will reach.
Despite the alcohol content, the gravity will usually never reach lower than 1.000.
This measurement is because residual proteins and un-fermentable sugars are present in the liquid.
The yeast can not metabolise these remaining proteins and un-fermentable sugars.
By knowing the original gravity (OG) and final gravity (GF), you can find out how much alcohol has been produced and therefore the alcohol content of your beer or wine, which will help determine your ABV (Alcohol by Volume).
How do I use a hydrometer to calculate ABV ( Alcohol by Volume)?
The ABV can be worked out only by taking the start gravity from the final gravity and dividing this figure by 7.362.
As an example, the starting point for your wine is 1.080 this then ferments down to 0.990. The drop is 90 points. 90 divided by 7.362 is 12.23% ABV.
Using a hydrometer when making wine
The starting gravity should usually be between 1.070 to 1.090 and the usual finished ABV will be between 10.5% to 13%.
Finish Gravity is typically 0.990 (for dry wines) to 1.005 (for sweet wines).
Brew Mart always recommend that wine should be fermented down to dryness and if you require a sweeter wine adding sugar or grape juice at the end will increase the sweetness.
Using a hydrometer when making beer
It can be complicated to give a definitive guide when brewing beer as there are so many beer brewing variations.
A typical beer will start (OG) at 1.045 and finish (FG) at 1.012 giving a 32 point drop (divided this by 7.362) making it 4.5%ABV.
How to measure the specific gravity using the hydrometer
By using the hydrometer, you measure how dense your beer or wine is.
This measurement means that you can estimate how much-dissolved brewing sugar is in the brew.
The gravity of the unfermented wort or must is called the original gravity (OG).
The hydrometer will show you the current density of the brew and can indicate the rate at which the yeast is converting the brewing sugar into alcohol.
This new measurement helps you assess the success and health of the fermentation. This stage is the most delicate stage of brewing.
It is also the stage when by reading the information which the hydrometer gives you, you can make adjustments to your brew.
How to use the hydrometer using a four-step process
Step 1: Using the trial jar with the hydrometer
Take the first measurement before you pitch your yeasts once the wort has cooled down to the optimum temperature required for the yeast.
This is commonly 20°C/68ºF for beer or wine and 15°C /59°F for lagers, this allows you to obtain the OG (Original Gravity).
When using the hydrometer, many people say that you can drop it into the bucket containing the wort.
Brew Mart do not recommend this as it increases the risk of contamination, even if everything has undergone sterilisation.
It is also more challenging to take an accurate reading as you need to be at eye level with the hydrometer and the rim of the bucket prevents this.
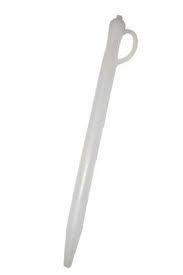
The best practice is to use a wine thief with a trial jar.
Draw the wort or must into the trial jar using the tap on your fermentation bucket or a wine thief to transfer the liquid.
Half fill the trail jar to avoid spillage from displacement, then entirely suspend the hydrometer into the liquid.
Place the trial jar on a flat surface.
Carefully place the hydrometer into the trail jar, it can move about a little, wait for it to settle down, you can also give it a little spin at this stage to eliminate any air bubbles.
It also makes sure that the hydrometer is not sticking to the side of the trial jar.
Step 2: Obtain the Original Gravity Reading
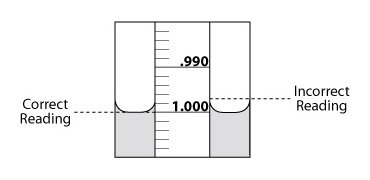
You will notice that the surface of the liquid in the trial jar is slightly concave (U-shaped) - this is called the meniscus.
The accurate reading to take is the level at the centre/base of the curve.
Take note of this reading.
This reading will enable you to work out how strong your fermented beer or wine is later in the process.
The reading will depend on the beer or wine kit you used, how much you diluted it and the amount of sugar you added.
A typical beer wort OG will be between 1.035 and 1.060.
Your ingredient kit will list an OG so that you'll have a reference for what your wort's OG should be.
A typical wine must OG is between 1.075 to 1.090 (a lot of instructions will leave out the point and write 1090, for example).
In a few days, the gravity will have dropped to 1.040 and will finish in the region of 1.000 to 0.990.
Brew Mart does not recommend that the liquid in the trail jar is poured back into the bucket; you can either discard it or drink it.
Remember that specific gravity is heavily influenced by temperature.
Most hydrometers are calibrated to read at 20°C (68°F).
Step 3: Calculate with Temperature
Knowing the temperature of the wort is critical for reading the original gravity (OG). The best practice is to use the hydrometer when the wort or must temperature is 15°C - 59°F for lager or 20ºC - 68ºF for beer or wine.
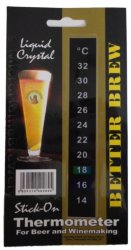
Use a stick on thermometer that sticks to the side of the fermenter, to measure the temperature of the main batch.
Doing this is safer than using a thermometer and inserting it into the liquid and potentially ruining your brew by adding bacteria.
If the temperature reading is different, you can use the table below to work out the accurate reading.
Step 4: Obtaining the final gravity reading (FG)
When the fermentation process is nearing completion or better still actually completed another hydrometer reading is needed to obtain the final gravity (FG).
Don't be tempted to take this reading to soon as the recommendation is only to do two readings — one to obtain the original gravity and one to get the final gravity.
Care must be taken each time not to expose your beer to harmful air or bacteria which could spoil the entire batch.
At the final gravity stage, your wort is now officially a beer, and the final gravity reading should be close to the FG reading in the instructions of the home brew beer kit used.
A typical beer's FG is between 1.015 and 1.005 and should be about 1/4th or 1/5th of the beer's OG.
If additional testing is needed, possibly due to a stuck fermentation, do use extreme caution to limit exposure to harmful bacteria.
If fermentation is not complete, i.e. the hydrometer is not reading 1.010 or below, then fermentation has stuck and needs re-starting.
If fermentation is not complete, it typically requires a "re-start" yeast and doing that should sort out any problems and start the fermentation process once more.
Temperature Correction Chart for Hydrometer Reading
| °C | °F | G | °C | °F | G |
| 0 | 32 | 0.0007 | 25 | 77 | 0.0021 |
| 1 | 33.8 | 0.0008 | 26 | 78.8 | 0.0023 |
| 2 | 35.6 | 0.0008 | 27 | 80.6 | 0.0026 |
| 3 | 37.4 | 0.0009 | 28 | 82.4 | 0.0029 |
| 4 | 39.2 | 0.0009 | 29 | 84.2 | 0.0032 |
| 5 | 41 | 0.0009 | 30 | 86 | 0.0035 |
| 6 | 42.8 | 0.0008 | 31 | 87.8 | 0.0038 |
| 7 | 44.6 | 0.0008 | 32 | 89.6 | 0.0041 |
| 8 | 46.4 | 0.0007 | 33 | 91.4 | 0.0044 |
| 9 | 48.2 | 0.0007 | 34 | 93.2 | 0.0047 |
| 10 | 50 | 0.0006 | 35 | 95 | 0.0051 |
| 11 | 51.8 | 0.0005 | 36 | 96.8 | 0.0054 |
| 12 | 53.6 | 0.0004 | 37 | 98.6 | 0.0058 |
| 13 | 55.4 | 0.0003 | 38 | 100.4 | 0.0061 |
| 14 | 57.2 | 0.0001 | 39 | 102.2 | 0.0065 |
| 15 | 59 | 0 | 40 | 104 | 0.0069 |
| 16 | 60.8 | 0.0002 | 41 | 105.8 | 0.0073 |
| 17 | 62.6 | 0.0003 | 42 | 107.6 | 0.0077 |
| 18 | 64.4 | 0.0005 | 43 | 109.4 | 0.0081 |
| 19 | 66.2 | 0.0007 | 44 | 111.2 | 0.0085 |
| 20 | 68 | 0.0009 | 45 | 113 | 0.0089 |
| 21 | 69.8 | 0.0011 | 46 | 114.8 | 0.0093 |
| 22 | 71.6 | 0.0016 | 47 | 116.6 | 0.0097 |
| 23 | 73.4 | 0.0016 | 48 | 118.4 | 0.0102 |
| 24 | 75.2 | 0.0018 | 49 | 120.2 | 0.0106 |
Check out all brew Mart's home brew hints & tips
A guide to brewing